'Tis the Season for Giving: Holiday Gift Ideas for the Classroom


I am an teaming up with Focused on Fifth and other awesome teacher bloggers Counting Down 'Till the Big Day with some fun ideas for you!

Today it's all about holiday gift ideas for the classroom!

A cute idea I did last year for my kiddos was Elf Kisses!  I just put some Hershey Kisses in a plastic baggie with a cutout of the little saying.  I did these for my 3rd graders and they loved it.  I also did it for my son's daycare class and I'm planning and sending this little treat in again for his preschool class.  It's great for all ages!


You can grab this little FREEBIE in my TpT store here!
Merry Christmas!

Now hop around to find some more fun ideas for gifts in the classroom!


Click on the button below to check out the whole series of Unwrapping Holiday Classroom Ideas!

http://www.focusedonfifth.com/2015/11/unwrapping-classroom-holiday-ideas.html


0

Teacher's Little Helpers: Holiday Products to Get You Through the Month!


I am an teaming up with Focused on Fifth and other awesome teacher bloggers Counting Down 'Till the Big Day with some fun ideas for you!

Today it's all about holiday products to get you through to winter break!

I've got a few Christmas themed products to share with you.
First up is my Christmas Math Worksheet Pack.  This is great for review and practice of beginning of the year math skills!
 There are 11 Christmas themed math worksheets that cover:
Working with Hundreds Models, Expanded Form, +/- 100, Addition & Subtraction Story Problems, Counting by 2's & 5's, Addition & Subtraction Facts, 2 digit Addition & Subtraction and Telling Time to the Half Hour.
 Next up is my Merry Measurement!  This is for 3 Christmas themed activities to practice measuring inches and centimeters.  A perfect fun supplement to your measurement curriculum!  You can read more about it at my post here.
https://www.teacherspayteachers.com/Product/Merry-Measurement-Inches-Centimeters-2190477

I also have some fun holiday math and literacy centers.
https://www.teacherspayteachers.com/Product/Holiday-Literacy-Math-Centers-Bundle-1004614
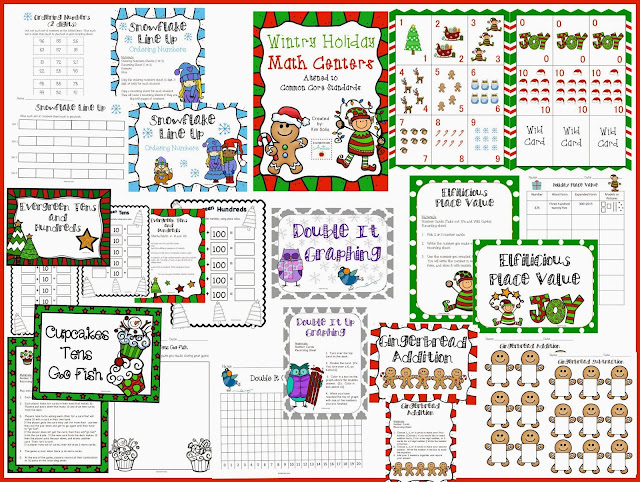
These Wintry Holiday Math Centers include 6 holiday and winter themed math centers:
Snowflake Line Up (2.NBT.A.4)-Ordering Numbers with 2 & 3 digit options
Evergreen Tens & Hundreds (2.NBT.B.8)- +/- 100
Elfilicious Place Value (2.NBT.A.1 & 3)- Showing numbers in word form, expanded form and using models
Cupcakes Tens Go Fish (2.OA.B.2)- Combinations of 10
Double It Up Graphing (2.NBT.B.5)- One, two or Three Digit Addition & Subtraction

Also included are some holiday themed number cards that are used with 5 of the centers.  The great thing about using the number cards is that your students can visit these centers multiple times and each time they will work with different numbers! 
The Whooo's Ready for the Holiday Literacy Centers include 4 different literacy centers!
https://www.teacherspayteachers.com/Product/Whoos-Ready-for-the-Holidays-Four-Literacy-Centers-or-Activities-999844
Ornament Compound Word Match Up (L.2.4.d) -Students match words to make a new compound word and record their answers.
Make Me Plural- Students sort words according to whether they need to add -s, -es, or -ies to make the word plural and record their answers.
Holiday ABC Order- Students sort and record words in alphabetical order.
Santa’s Prefix Sort (L.2.4.b)- Students match the words with prefixes to the word meanings and record their answers.

I've even got some Addition, Subtraction and Multiplication Scoot Task Cards!
https://www.teacherspayteachers.com/Product/Christmas-Scoot-Addition-Task-Cards-2182694

This isn't all of it, so check out ALL of my Christmas products HERE! There's a couple of freebies included in that list too. :)

Now, hop around to see what everyone else has to offer!


1

Counting Down 'Til the Big Day: Holiday Themed Math- Merry Measurement!

I am an teaming up with Focused on Fifth and other awesome teacher bloggers Counting Down 'Till the Big Day with some fun ideas for you!

Today it's all about Holiday themed math activities!

Depending on my districts learning schedule, I seem as though I am often times ending up either finishing up or smack in the middle of my measurement unit right when the holidays get into full swing. So, because of this I try to find ways to incorporate the holiday spirit in some of my activities.  One year I decided to do some Christmas Candy Measurement Bags as a fun center for my kiddos!

Christmas candy measurement bags are a great way to get your students practicing measurement while still incorporating the holidays!

All I did was gather some holiday themed candy, stick it in a Christmas bag, give the kiddos some rulers and - viola- a fun measurement center!  Depending on the grade level or needs of your students you can have them measure to the nearest inch, half inch or quarter inch, or to the nearest centimeter.  

Christmas candy measurement bags are a great way to get your students practicing measurement while still incorporating the holidays!
Just a sample of some candy that I used.
This was great because they were able to practice measuring things that weren't the "perfect" inch or half inch or centimeter and they had to use their knowledge and judgement to decide the length of the items.  Now, if you are just getting started with measurement this may be difficult, so you might want to find candy items that will be appropriate for your students to measure.  You can also differentiate this for your students' needs using different items or how you have them measure!

If you find yourself in need of some more holiday measurement activities you can check out my Merry Measurement- it's three Christmas themed activities to help your students with measuring inches and centimeters.

https://www.teacherspayteachers.com/Product/Merry-Measurement-Inches-Centimeters-2190477

This first activity included is Christmas Tree Measurement.  One way to use this in your classroom is to do some measuring around the room. First, laminate and cut out the 10 Christmas trees. Then, I like to tape them up around the room for students to find (I usually make 2 sets so that there a couple places for the kiddos to measure and it doesn't get crowded anywhere). Students first will estimate the height of each tree and record their estimate. Then they will measure how tall each tree is and record their actual measurement.  You could also just use this as a simple measurement center or rotation.


I've also done something just like this where my class elf, Jessie, left peppermint candy all around the room for the kids to measure.  Not real candy, but paper peppermint sticks.  Although Jessie did leave each kiddo a candy cane too! 

Our class elf left us some fun messages AND activities throughout the season!

Next up is Christmas Inches. This is a great fun activity or center! First, cut out and laminate (for durability) each holiday picture. Then, the students will measure the height of each picture and record their measurement on the recording sheet. 


  There is also a questioning worksheet on comparing the lengths of the pictures included. 


Last up is Merry Measurement.  Students just measure each line from one holiday character to another using centimeters and record each measurement on their recording sheet.  A super easy and fun center or activity!


Jump on over to all of the other blogs to find some more holiday math ideas and activities!


http://www.focusedonfifth.com/2015/11/unwrapping-classroom-holiday-ideas.html

3

Procedural Writing with Edible Turkeys!


I recently made these edible turkeys with my son for his preschool class Thanksgiving party.  They are so cute!  It got me thinking that these would be a great to have students make for fun AND to use for procedural writing.  


In the past, I have always liked to use a fun food idea, that we make as a class, as a way to introduce procedural or functional writing.  I've done edible pencils, spiders, cream cheese and jelly crackers, edible reindeer- you get the idea.  Kids love food and the ideas are fun and relatively easy, so they can remember all of the steps needed to write about it.  Sometimes I've modeled all of the writing steps while we make these things- listing ingredients, steps, etc. And other times I've simply modeled making the food while they followed along making theirs and doing all of the writing on their own.  It just depended where we were in the process of learning about the writing genre.


Ingredients for each turkey:
2 Double Stuffed Oreos
1 miniature Reeces peanut butter cup
1 Whopper
6 candy corn (5 for feathers, 1 for beak)
chocolate frosting
yellow & red frosting

Simple instructions:
1.  Stick five candy corn in Oreo for feathers.  I used chocolate frosting to ensure they were really stuck in there, but you don't have to do that.
2. Using chocolate frosting as glue, glue the 2 cookies together to make a base for the turkey body.  Lay the cookies down, with the candy corn cookie on the bottom, and allow the frosting to harden and bond the cookies together for a few minutes.
3. Glue the Reeces to the base cookie with the frosting.  Glue the Whopper onto the Reeces with the frosting to be the turkey's head.
4.  Cut the white tip off of the last candy corn.  The white part will be the turkey's beak.  Using the frosting, glue the beak to the head of the turkey.
5.  Using yellow frosting, make two turkey eyes on the Whopper.  Then draw two turkey claws on the base cookie.
6.  Last, using the red frosting, make a little turkey gobbler under the beak.


You can always just make these for a fun treat too!  I just stuck each turkey into a plastic cup and into a clear plastic bag and tied them up with ribbon.  Super cute for a Thanksgiving feast celebration!


1

Book Character Pumpkins

I just wanted to share a cute idea that I have done in the past with my classes around Halloween.  We don't technically celebrate Halloween at my school, but Kindergarten always had the opportunity to dress up as their favorite book characters and have a fun little parade around the school.  To go along with this, our school PTA gives each class a pumpkin to decorate as a book character.  We've done some cute ones in the past, but our Bad Kitty one was my favorite.  It's so fun to walk around all of the hallways and see the creative ideas each class has.


We've given our kiddos the chance to bring in their own pumpkins decorated as their favorite book characters and they really did an awesome job!  We displayed these in the class and hallway through Halloween and the kids just love it.  It's such a fun idea to incorporate the fall holidays with a love of reading!

1

Sign up for my New Newsletter!

Sign up to receive my newsletter to get access to special sales on new products, great ideas and newsletter subscriber only FREEBIES! 
In fact, I'll be sending you your first freebie just for signing up!

CLICK HERE TO SIGN UP


0

*FALL* in Love with Teaching Blog Hop & Printing on Sticky Notes!


Hi guys!  Welcome to our #thirdgradetribe Fall in Love with Teaching Blog Hop!  There are 20 of us ready to give you some fun tips, good ideas and show you some great resources for your classroom!  Make sure you hop around to everyone for a special chance to enter giveaways or get an awesome freebie from all the teachers in the hop.  Plus, make sure you enter our special GRAND PRIZE GIVEAWAY!  There will be 2 big winners- one person will win a $50 TpT gift card and another lucky friend will receive a $25 TpT gift card!

Today I want to talk about telling time!  (I know it's not very fall like, but hopefully you're going to be teaching this soon.) Now, I know in third grade it's assumed that kids know how to tell time already and are ready to move on to elapsed time.  That would be great, wouldn't it?!  Well, I always reviewed telling time for, I would say, at least a week before I ventured in to elapsed time when I taught third grade math.  We got out our Judy clocks and practiced, practiced, practiced.

One little trick that I liked to do to practice throughout the day was use sticky notes for a quick check assessment.  Basically, I just used my clock stamp to stamp blank clocks on a bunch of sticky notes or I would put my sticky notes on a template I had made in Power Point and then print off blank clocks on all the sticky notes.  Each student would have a blank clock sticky note on the corner of their desk and randomly throughout the day I would call out a time and my students would have to draw the hands on the clock and write the time.  I would collect it and look them over to easily be able to see who got it or who still needed more practice. 


1.  Print the template or make your own.
I created a really simple template for printing on sticky notes in Power Point.  You can grab it here.
I included the blank clocks on the second slide for you to use when printing.

2.  Stick the Post-It Notes on the page.
Put your six Post-It Notes on the printed template.  Make sure you have the adhesive side at the top of the square each time.

3.  Print what you want on the Post-It Notes.
Find your printer's manual feed tray to put your sticky note paper in.  If you're not sure which way your printer prints paper then you will want to run a quick test print page to figure it out.  Make sure the adhesive end on the Post-It Note is going into the printer first!  If you don't do this then it could damage your printer.  Then, print one page at a time of your design.

Obvi, you can use this sticky note template to print ANYTHING on sticky notes!  It's awesome!  I also loved using pre-printed sticky notes in guided reading and for easy writing rubrics for students to evaluate their writing.  This is also great to use in interactive notebooks or journals- instead of printing labels (which can be expensive), just print straight onto the sticky note.
This is just so easy- I promise!

If you need more practice with telling time check out my Telling Time Centers.  These five centers were designed to meet the second grade standards, but would be great to use throughout the year for your third graders to review!


https://www.teacherspayteachers.com/Product/Telling-Time-Centers-2nd-Grade-2008465

And now for the giveaways!!! Both of these giveaways will run from 9/26-9/30!


Enter using the Rafflecopter below to win your own copy of my Telling Time Centers.  And since it's fall now, I'm also giving away my Sweet Fall Rounding Task Cards!
https://www.teacherspayteachers.com/Product/Sweet-Fall-Rounding-Task-Cards-1458737
 
And now enter to win our GRAND PRIZE- a $50 TpT gift card and a $25 TpT gift card!

Next on the hop is my friend, Anna, 
Just click the image below to head on over!
http://hangingwithmrshulsey.blogspot.com/2015/08/fall-in-love-with-teaching-giveaway.html
  Happy Fall Y'all!

5

A Special Freebie!

Just popping by to share with you a special freebie to celebrate all of your support in this TpT journey.  Last week I reached 500 followers for my little Teachers Pay Teachers store and so I had to make something that I hope you can use in your classroom.  

https://www.teacherspayteachers.com/Store/Kim-Solis

You will find all the pennants you need to make your superhero banner that says, " ____ GRADE ROCKS" for 1st-5th grade.  There are also 6 different superhero pennants and two blue pennants so that you can customize your superheroes. 

Here's the banner printed and hanging in my family room (since I'm not in a classroom this year)!
Grab it in my store by clicking either picture!

https://www.teacherspayteachers.com/Store/Kim-Solis


0

Back to School Hop

Well, it's that time.  Or maybe it's almost that time for you. Back. To. School.  It's the best of times and the worst of times... lol.  Thanks to The Owl Teacher I'm teaming up with some awesome bloggers for our Back to School Hop to give you guys some fun ideas just for this time of year.


I thought I'd share a little about one of the lessons I liked to do the first week of school for part of my Reading Workshop.  I'm a huge believer in the importance of independent reading and I almost always started some sort of independent reading the first day of school.  The first couple of days the kiddos were usually just reading from their book bins that I kept on top of their group of desks that had a variety of reading levels and genres.  As I introduced our library and completed DRA's the students were able to pick out books for their individual book bags on their own independent levels.   

But, before any of that we spent at least one lesson discussing what independent reading was and what it should look like in our classroom.  As we discussed this, we made a simple 3 point rubric for independent reading.  My three levels were usually Amazing, Okay, and What?  (as in "What are you thinking? This is definitely not what you should be doing!" haha).  As the kiddos helped to tell me what a great independent reader did and looked like, I charted their ideas (see Anchor Chart below) and we practiced showing what it looked like as well.  From there we did the opposite- what it shouldn't look like.  I always made a really big deal about this "WHAT?" category being funny and shocked that anyone would ever even do this during I.R., plus I always showed plenty of non-examples.  The kids always got a kick out of it.  Then we did the middle level.

Make an Independent Reading Rubric with your class at the beginning of the year to set the expectations for independent reading time.

That day we practiced independent reading for about 10 minutes (every day we practiced reading longer amounts of time- up to about 45 minutes) and I would spend that time really observing students and looking for those AMAZING on the rubric readers.  I also reminded my readers that weren't quite on the amazing level what they should be doing.  After independent reading time that week students would share what level they were on the rubric that day and give examples why they assessed themselves that way.  I always had a couple of students share with the whole class and everyone shared how they assessed themselves with their partner. 

These first few days spent just observing and watching were essential for me to establish the expectations for our daily reading time.  Later on I would do guided reading and student conferences daily while my students were independent reading and/or completing literacy rotations.  

Now, for some fun giveaways!  
All of my blogging friends have a great prize package for you to enter to win a ton of great products below.   I completely forgot to send my contribution in time to get in our organized giveaway (mommy brain!!), so I'm doing my own giveaway too!  

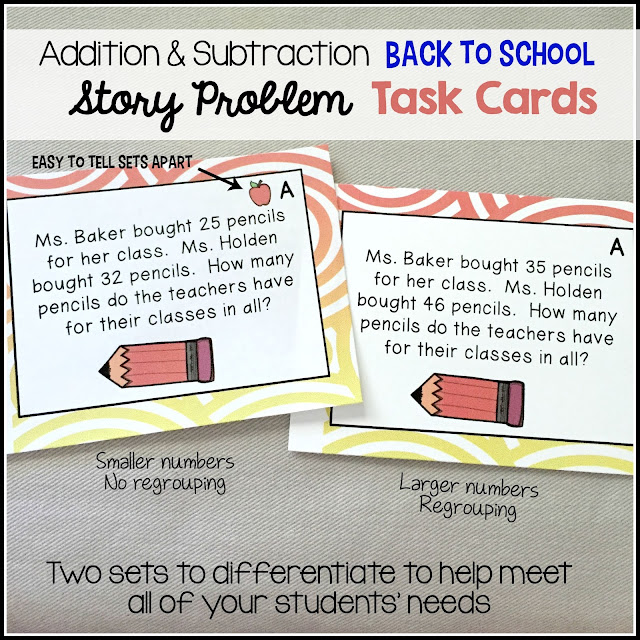
You can enter to win my Back to School Story Problem Task Cards and ANY OTHER PRODUCT FROM MY STORE!  Just enter using the Rafflecopter below.

Elementary Antics: Back to School Story Problem Task Cards. Two sets of addition and subtraction task cards- great for centers for your kiddos. Easy to differentiate for your students needs.


 Enter the K-2 prize pack on the Rafflecopter below :)


Hop around to all of the other blogs below! 


6

All Things Bullentin Boards #2togetherWeAreBetter


I am so excited to be linking up with Lucky Little Learners and Schroeder Shenanigans in 2nd for this month's 2gether We Are Better post all about BULLETIN BOARDS!

I don't know about you all, but bulletin boards are not a huge thing to focus on at my school much anymore.  When I first started teaching 12 years ago bulletin boards were a BIG deal- especially the beginning of the year board.  Nowadays (at least in my district) we just don't have the time to worry too much about changing our bulletin boards every month.  The last couple of years what I have done in my hallway board is use a design that will work all year that incorporates our school theme.  Then I just switch out the work that is displayed every month or so to keep it updated.  Now, this isn't glamorous and anything, but it was what worked for me and the I was able to spend my time working on a lot of other things in my classroom (like getting centers ready, looking at data, organizing my library, plus 100 more things)!  


This year I am no longer in the classroom, so I don't have a bulletin board to show you all from this year.  But I do have a few from my archives. :)  

Now, last year my school's theme was a beach/surfing theme, so I did a pretty simple "Surfing into 2nd Grade" Welcome Board.  If you're familiar with Krista's work from Creative Clips, then you will totally recognize her cute clip art on my board above.  I had a lot of questions about how I printed that out or where I printed it big enough for my board.  Well, guess what?  I didn't print it!  I thought back to the old days when I used to watch my 3rd grade teacher make giant pictures for our classroom after school.  She used to copy a picture on an overhead and project it on the wall where she traced the now giant image on butcher paper.  Obvi, I don't have an overhead projector anymore, but I did have a projector and a computer!  So, same idea with modern technology.  I hooked up my computer, opened the line art picture and projected it on my classroom wall where I had white bulletin board paper taped up.  I traced the art and then painted it and cut it all out.  Viola!  Totally cute clip art in bulletin board size.  I kept that cute summer buddy bird and his surfboard up on my bulletin board all year and just added student work and a new title every month or so.  
Keepin' it simple!


Here's an example from the year before.  We had a cruise theme.  (Can you tell we live near the beach??)  I found this awesome chevron fabric and used it to cover my board.  I added a giant anchor and our school theme.  Then, I just changed the work throughout the year.  You can tell this picture was around winter time since we had just done our hot chocolate book reviews (a freebie from Across the Hall in 2nd Grade.)  Again, just keepin' it simple.  Same background all year and just update the student work.  By the way, if you don't cover your bulletin boards with fabric- you should!  I usually cover all the boards in my classroom and the hallway with fabric or plastic Dollar Store tablecloths so I don't have to worry about fading or anything like that throughout the year.

https://www.teacherspayteachers.com/Store/Kim-Solis

Follow my Bulletin Boards pin board on Pinterest for lots more fun ideas!

 
Go check out all of the other super fabulous bulletin board ideas in this awesome linky!
http://www.luckylittlelearners.com/


4
Back to Top